Want to tone and define your arms with no equipment? At HealthBoost we’re all about exercises that deliver results without a gym. Tricep dips are a powerful and easy exercise you can do anywhere to build upper body strength and stability. This bodyweight exercise targets your triceps but also engages your core, shoulders and chest for a full body workout. In this guide HealthBoost will walk you through the correct form, technique tips and variations to suit all fitness levels so you get the most out of every dip. Whether you’re new to tricep dips or looking to perfect your form, follow along to get results safely and effectively.
How to do Tricep Dips
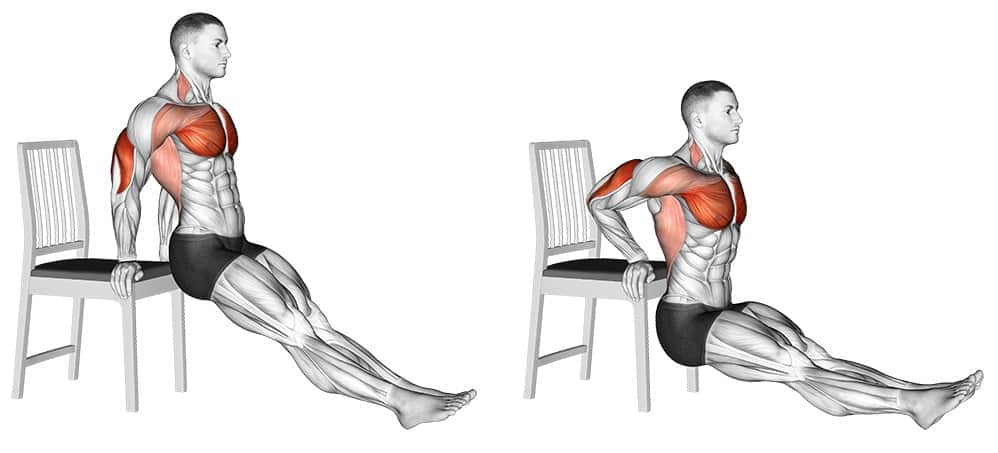
Tricep dips are one of the best bodyweight exercises to build strength and definition in your triceps, shoulders and core. The beauty of this exercise is it’s versatility; you can do tricep dips at home, the gym or anywhere with a sturdy chair or bench. Follow these steps to get the form right.
- Set Up: Sit on the edge of a chair, bench or step, with your hands on the edge beside your hips. Your fingers should be pointing towards your feet, legs straight and feet hip width apart, heels on the ground. Your gaze should be forward, chin up.
- Start the Movement: Press down on your palms to lift your body, slide forward just enough so your hips clear the edge of the chair. Your arms should be straight but don’t lock your elbows.
- Lower Your Body: Slowly bend your elbows to lower your body until they are at 45-90 degrees. This range of motion will engage your triceps without putting too much strain on your shoulders.
- Push Back Up: Press into your palms to lift your body back to the starting position. Straighten your arms but don’t lock your elbows, keep a slight bend to keep tension on your triceps.
Tips: 2-3 sets of 10-12 reps. Add more sets or reps as you get stronger.
Benefits of Tricep Dips
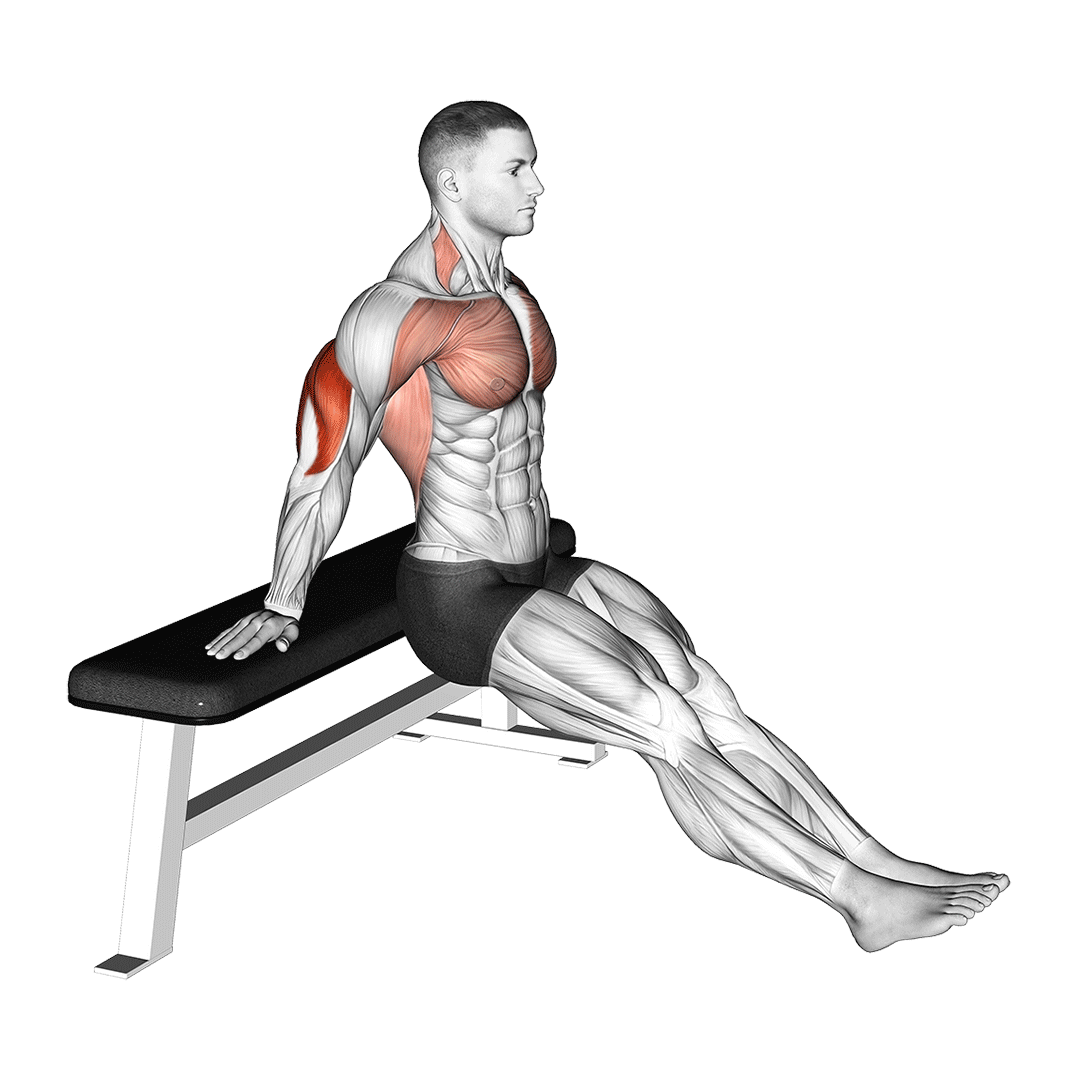
This targets the triceps brachii, the muscle at the back of your upper arm that controls elbow extension. Here’s the benefits:
- Triceps Strength: Tricep dips are great for building and toning the triceps, gives you stronger, more defined arms. Strong triceps are useful for daily tasks like pushing, lifting and carrying.
- Core Stability: Keeping your body lifted during tricep dips engages the core, helps you improve stability.
- Muscle Balance: Many people focus on bicep exercises but neglect the triceps. Tricep dips balances your arms, helps prevent injuries and overall upper body strength.
- Minimal Equipment: Tricep dips is perfect for home workouts, requires only a chair, bench or any stable surface.
- Functional Movement: The pushing motion of tricep dips mimics everyday activities like pushing open doors, so it’s great for functional strength.
Technique for Tricep Dips
Form is key to getting the most out of tricep dips and not straining.
- Hand Position: Place your hands shoulder width apart on the edge of the chair with your fingers facing forward. This will prevent stress on the wrists and keep the triceps engaged.
- Elbow Position: Keep your elbows in as you go down and up. This will ensure the triceps are doing the work not your shoulders.
- Shoulder Position: Don’t scrunch your shoulders up towards your ears. Keep them down and back to not strain them.
- Control the Movement: It’s tempting to speed through dips, but slow, controlled movement is far more effective. Lower your body slowly to feel your triceps engage and then press up with control.
- Breathing: Inhale as you go down, exhale as you come up. Breathing right helps you maintain a steady pace and not get tired.
Variations of the Tricep Dips
Once you’ve mastered the basic tricep dip, try these variations to increase the intensity or adapt the exercise to your fitness level.
Reduced Range of Motion Dips
For beginners, limiting the range of motion can make tricep dips more manageable. Instead of lowering your body until your elbows are at a 90-degree angle, try stopping at a 45-degree angle. This variation requires less tricep strength and helps build a solid foundation before advancing to a full dip.
Tricep Dips With Bent Knees
This modification is slightly easier than traditional tricep dips. Bending the knees shifts some of the body weight from your upper body, making the exercise more accessible for beginners. This version reduces shoulder strain and still engages the triceps effectively.
Tricep Dips Using Two Chairs
For a more challenging variation, use two sturdy chairs or benches. Place your hands on the edge of one chair and your heels on the other. This position elevates your entire body, placing more emphasis on the triceps. The wider range of motion makes it a more intense workout for advanced users.
Tricep Dips With Bars or Rings
Using parallel bars or rings for tricep dips is another advanced variation, requiring full body weight support. In this version, you’ll grip the bars or rings with an overhand grip, bend your knees, and lower your body until your elbows are at a 90-degree angle. This version requires core strength and stability, so it’s best for those experienced with tricep dips.
Each of these variations challenges the triceps differently, so you can choose a version that best matches your fitness level.
Common Mistakes to Avoid
Even small mistakes in tricep dips can lead to discomfort or injury. Here’s what to watch out for:
- Hunching Shoulders: One of the most common errors is letting the shoulders hunch up toward the ears. Keep your shoulders back and down to prevent shoulder strain and maintain focus on the triceps.
- Dipping Too Low: Lowering your body beyond a 90-degree elbow angle places extra stress on the shoulders, increasing injury risk. Stop once your elbows reach a 90-degree angle, or even slightly higher if you feel any discomfort in your shoulders.
- Locking the Elbows: Avoid locking your elbows at the top of the movement, as it can put strain on the joints. Instead, keep a soft bend to maintain tension on the triceps throughout the exercise.
- Leaning Forward: Leaning too far forward shifts the focus to your chest, reducing the activation of your triceps. Maintain a straight line with your torso to keep the emphasis on your triceps.
- Fast, Jerky Movements: Slow, controlled movements are key to proper form in tricep dips. Jerky motions can strain the triceps and lead to incorrect muscle engagement.
Correcting these mistakes can improve the effectiveness of your workout and protect your joints from strain.
Conclusion
Tricep dips are a foundational exercise for building arm and shoulder strength. With a variety of modifications, they’re accessible for all fitness levels, requiring only minimal equipment to perform effectively. Remember to focus on proper form, avoid common mistakes, and choose variations suited to your fitness level to get the most from your tricep dip workout.
With consistent practice, you’ll notice improved arm strength, core stability, and better balance across your upper body. Embrace tricep dips as a staple in your routine to build strong, defined arms and enhance your overall fitness journey.